Have a Question?
May 2014
You can subscribe to this Newsletter if you sign up for an account with Titan Reloading.
CLICK HEAR TO REGISTER AN ACCOUNT
CLICK HERE To browse an archive of past newsletters.
 MAY 2014 NEWSLETTER
Yeah Buddy…..it’s May…..OOHRAH!! Time to get out the grill, the golf clubs, the guns, the scooters and yes…..the race car. I don’t know about you but I LOVE this time of year.


We are truly enjoying all the friends we have made through Titan Reloading and look forward to many more. Feel free to contact us. When possible, please email us rather than call. Due to our limited phone system and staff we are able to respond to your questions quicker via email. Please include your full name or order ID number with any order inquiries. Service and Support is our top priority. As always, you will find many answers to questions in the “FAQ” and “Help Videos” areas of our website www.titanreloading.com
Dennis / Titan Reloading
FEATURED PRODUCT:
LEE BREECH LOCK CHALLENGER PRESS KIT
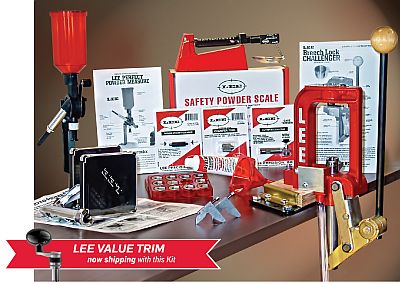
NEW IN 2014. This kit now includes the Value Quick Trim to prep your cases on the press.
This kit replaces the popular 35th Anniversary Kit features the same components as the 50th kit but we have replaced the Safety Prime with the Auto-Prime XR and a set of Auto-Prime shell holders. This kit is for those who prefer to prime off of the press.
Includes the new Breech Lock Challenger Press and one Breech Lock quick-change bushing.
You get a complete powder handling system, with the most convenient and repeatable Perfect Powder Measure. Plus the Lee Safety Scale, the most sensitive and safest of all powder scales and fill your case with the included Powder Funnel.
Case Preparation Tools include a Value Quick Trim that allows you to trim the cases right on your press (order caliber specific trim dies separately) and a cutter and lock stud to trim your cases by hand (order caliber specific case length gauge separately). An included Lee chamfer tool chamfers the inside and outside of the case mouth and a tube of premium sizing lube is included. A small and large primer pocket-cleaning tool completes the case preparation package. $13.92 value.
Purchased separately, a $192.00 value
LEE BREECH LOCK CHALLENGER PRESS PRODUCT REVIEW
Specifications:
Frame Material: Die Cast Aluminum
Frame Design: O Frame
Frame Offset: 30 Degrees
Frame Opening Size: 4-1/4″
Handle Location: Bottom Right or Left
Die Size Accepted: Standard 7/8″-14 Threaded Dies
Die Bushing Accepted: Yes
Die Bushing Brand Used: Lee Breech Lock Quick Change Bushings
Spent Primer Collection System: Yes
Ram Stroke: 3-1/2″
Ram Diameter: .815″
Priming Feature: No
Number of Mounting Holes: 3
Mounting Hardware Included: No
Includes:
**Challenger Breech Lock single stage press
**1 Breech Lock Die Bushing
**Lee Safety Scale
**Perfect Powder Measure
**Powder Funnel
**Value Quick Trim
**Lock Stud and Cutter
**Lee chamfer tool
**Primer Pocket Cleaner
**Auto-Prime XR
**Set of Auto-Prime Shellholders
**Tube of Sizing Lube.
Note:
A Lee Case Length Gage, sold on the Case Length Gage and Shellholder page, will need to be purchased for each caliber being reloaded for the Lock Stud and Cutter.
A Lee Quick Trim Die, sold on the Quick Trim Case Trimmer page, will need to be purchased for each caliber being reloaded for the Value Quick Trim.
The Bench Plate 90251 shown in the picture is not included with this kit and is sold on the “Press Accessories” page.
INSIGHT OF THE MONTH:
Eliminating Load Master Priming Problems
To get a Load Master priming properly, there are a few things to consider that are inherent to the design of the press. I have listed 2 points below but first I need to stress the importance of a sturdy bench to mount your Load Master to. The press should not be able to flex and jiggle when you apply pressure to the handle at the top of the ram stroke. The priming system slides the primer on top of the priming pin just before the top of the ram stroke and then at the top the priming pin is raised to push the primer into the pocket in the case. If the press jiggles at this crucial moment the primer can move slightly. If it moves far enough it will catch one side of the pocket and the primer will tip over. A sturdy bench is an absolute must. And now, on to the 2 main points of consideration regarding Load Master priming.
1. Each die in each set needs to be set properly so that the work is completed at the VERY TOP of the ram stroke. This is more necessary with a Load Master than a Dillon because the Load Master primes on the upstroke and it is an adjustable setting. If you set the sizing die too deeply and prevent the carrier from reaching the top, and then set the primer seating depth bolt to properly seat primers with this die setting, everything works fine. Then, you switch calibers and the next sizing die setting allows the carrier to go further up – then your previously set primer system is now set too deeply. This can lead to a broken Primer Rocker Arm and all of the other symptoms will show up – tilted primers, smashed primers, broken primer system parts, etc. In conclusion, all die sets should allow the carrier to go all the way to the top and have the work done at that location. If this is done, the primer system has to be set once and that’s it. The sizing die setup is the key to the Load Master. Raise the press ram to the top of the stroke and hold it there while you thread the sizing die in until it makes firm contact with the shell plate (no gap between the die and shell plate). Turn the die 1/8-1/4 turn more and finger tighten the sizing die lock ring against the turret at this setting.
2. If the primer adjustment is set too deeply, what happens is that the primer slider has to try and place a primer up and on an already rising post. This results in damaged parts and mounds of frustration with the above symptoms. This is how to set it properly, but after doing step #1 because this operation has to be done in conjunction with #1. With no turret in the press, put a fired case (with a spent primer in it) into station #1 and advance it to station #2. Be sure the primer seating depth bolt (on the upper left side of the press) is turned as high as it will go. When the carrier is at the top with the fired case in station #2, hold the handle down to keep the carrier at the top. With your left hand, push the primer rocker arm (the lever that the depth bolt pushes) down as far as it will go. This puts the priming plunger up tight against the bottom of the case. Turn the primer depth bolt down to meet this location (until it stops), lower the carrier and turn the bolt down further not quite a half turn more and secure it. Along with #1, you have just solved the priming problems that many complain about.