Have a Question?
June 2011
 JUNE 2011 NEWSLETTER
Memorial Day has come and gone but Robin and I want to THANK ALL of our military veterans, past and present, for the sacrifices made to uphold the freedoms we enjoy every day. THANK YOU.
We also extend our heartfelt support to all of our friends that have been hit by violent storms. This is the second month in a row that weather has changed people's lives. The storms are powerful, but not more powerful than the spirit of the people involved. We watch with pride as our fellow citizens drop what they're doing to help.
We are truely enjoying all the friends we have made through Titan Reloading and look forward to many more. Feel free to contact us. Service and Support is our top priority. I have a day job so the best time to call for support is between 6-10 PM CST. I am able to answer emails throughout the day. Robin can take your service calls daily and will pass any support questions she can't answer on to me. As always, you will find many answers to questions in the "FAQ" and "Help Videos" areas of our website www.titanreloading.com
Dennis / Titan Reloading
NEW IN 2011:
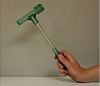
Kinetic Bullet Puller by Quinetics Corp.
The ULTIMATE Kinetic Bullet Puller by Quinetics Corp.
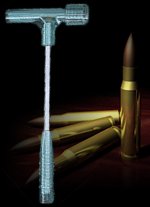
The Kinetic ® Bullet Puller by Quinetics Corp. is 100% American made and is designed to separate bullets from their casing using "Kinetic Energy". This bullet puller can fit many different calibers of rifle and pistol ammunition. If used correctly, it's very long lasting and also comes with an extended warranty. If you reload ammunition frequently, the Kinetic® Bullet Puller is a great investment for your longtime hobby.
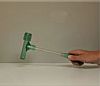 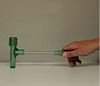 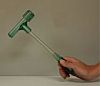  |
A quick rap extracts the bullet from the casing with no damage to components. Working with the principles of kinetic energy, it's the bounce that removes the bullet from the case. If the bullet does not come out the first time, simply tighten the chuck and rap again.The patented "New Twist" Chuck Assembly evenly grips and holds the case; bullet and powder are caught, so there's no waste. For all popular rifle and pistol, rim, or rimless center fire cartridges. NOT for use with rim fire cartridges or explosive projectile ammo.
The Ultimate Kinetic® Bullet Puller Is:
• Easy to Use
• Built with Safety in Mind
• A Great Investment for Your Hobby
• Made by Lifetime Members of the NRA
• Built for People Who Use Guns Frequently
• Comes with Complete Instructions
INSIGHT OF THE MONTH:
Load Master Priming Problems
To get a loadmaster working properly, there are a few things to consider that are inherent to the design of the press.
1. Each die in each set needs to be set properly so that the work is completed at the very top of the stroke. This is more necessary with a Loadmaster than a Dillon because the Loadmaster primes on the upstroke and it is an adjustable setting. Consider that if you set a die too deeply to prevent the carrier from reaching the top, and then set the primer seating depth to properly seat primers with this die set, everything works fine. Then, you switch calibers and the next die set allows the carrier to go further up – then your previously set primer system is now setting too deeply. All of the symptoms will show up – tilted primers, smashed primers, broken primer system parts, etc. In conclusion, all die sets should allow the carrier to go the top and have the work done at that location. If this is done, the primer system has to be set once and that’s it.
2. If the primer adjustment is set too deeply, what happens is that the primer slider has to try and place a primer up and on an already rising post. This results in damaged parts and mounds of frustration with the above symptoms. This is how to set it properly, but after doing so, operation has to be done in conjunction with #1. With no turret in the press, put a fired case (with spent primer in it) into station one and advance it to station #2. Be sure the primer seating depth bolt (on the left side of the press) is turned as high as it will go. When the carrier is at the top with the fired case in station #2, hold the handle down to keep the carrier at the top. With your left hand, push the primer rocker arm (the lever that the depth bolt pushes) down as far as it will go. This puts the priming plunger up tight against the bottom of the case. Turn the primer depth bolt down to meet this location (until it stops), lower the carrier and turn the bolt down further not quite a half turn more and secure it. Along with #1, you have just solved the priming problems that many complain about.
3. Primer problems on the Load-Master is usually caused by the primer pin sticking up a small amount. To fix this problem you must determine what is causing the pin to not completely retract.
To solve these issues, start by removing the primer trough, looking into the carrier you will find a hexagon hole, on one of the corners of the hex there is a shelf to prevent the primer pin from dropping down too far. This shelf can become fouled with dirt, gunpowder, or case cleaning media. Clean this shelf of any foreign material.
Now carefully inspect the primer pin for any nicks or burrs. A small nick on the large diameter of the pin will cause it to stick up and cause primer tipping. Lubricate the large diameter of the primer pin with a very light film of oil and return it to the primer feed well. Be sure the small spring is installed and intact.
Remove the trough cover and carefully inspect the hole where the primer passes through. Remove any burrs on this hole with a sharp razor knife. Feel free to enlarge the hole to remove any burr. The hole does not provide guidance for the primer, but any burr will cause a potential tipped primer. Carefully inspect the primer slider for any nicks, burrs or flash and be certain you have the correct slider for the primer size (small or large).
Reinstall the trough cover and apply a very small drop of oil to the black primer lever pivot. Now reinstall the primer trough. Cycle the primer rocker and be sure the primer pin retracts completely.
Now is a good time to check the primer seating depth bolt for proper adjustment. Remove the turret and run the press to the top of the stroke. Push down on the primer rocker arm. If you are unable to push the rocker arm down a small amount you likely have the primer depth bolt set down too far. Many times, this is the result of incorrectly set dies at some point. If a sizing die is set further than to just touch the shell holder, the carrier cannot go all the way to the top. This can make the user believe that the primer seating depth is now incorrect and not deep enough. When the deeper adjustment is made to the primer depth, the priming pin rises prematurely. This causes the primer slider to have to push the primer up and on the pin instead of simply sliding it on. This setting results in tipped primers and destroyed primer sliders. More damage can occur when the carrier can once again go to the top because the offending die has been readjusted or a different and properly adjusted die set installed. The deeper primer adjustment is now putting far too much pressure on the primer rocker arm and a destroyed carrier will result.
One last helpful change is to place your sizing die in position 2 with its decapper removed. Put a decapping die in position one. This will align case perfectly to accept the primer.