Have a Question?
June 2016
You can subscribe to this Newsletter if you sign up for an account with Titan Reloading.
CLICK HEAR TO REGISTER AN ACCOUNT
CLICK HERE To browse an archive of past newsletters.
 JUNE 2016 NEWSLETTER

Memorial Day has come and gone but we want to THANK ALL of our military veterans, past and present, for the sacrifices made to uphold the freedoms we enjoy every day. THANK YOU.
Robin, the Titan Crew and I are all doing well. Summer and all that goes with it is finally here and the only problem I can see is finding enough time to do everything as much as I’d like to. I have all summer to ‘get ‘er done’ so……ALL IS GOOD. I hope life is the same with you.
We are truly enjoying all the friends we have made through Titan Reloading and look forward to many more. Feel free to contact us. When possible, please email us rather than call. Due to our limited phone system and staff we are able to respond to your questions quicker via email. Please include your full name or order ID number with any order inquiries. Service and Support is our top priority. As always, you will find many answers to questions in the “FAQ” and “Help Videos” areas of our website www.titanreloading.com . Check us out on Google+ and Facebook .
Dennis / Titan Reloading
FEATURED PRODUCT:
Classic Cast Turret Press Kit
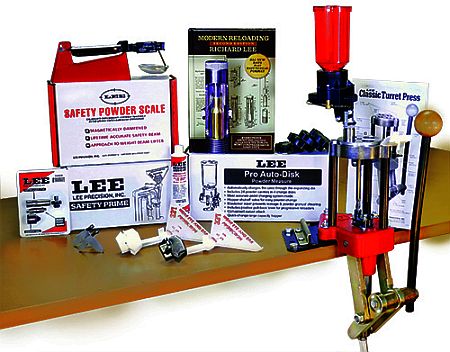
This kit and a set of Lee dies is everything you need to begin reloading. The Classic Cast Turret features solid steel linkage and a cast iron base.The Classic Cast Turret is fast and convenient when loading handgun cartridges, with rates in excess of 250 rounds per hour possible.
The kit includes the Pro Auto-Disk powder measure and riser, perfect for all handgun and small rifle cartridges. Large and Small Safety Prime are included making on press priming an ease. Instant change 4 hole turrets make changing calibers a snap. Deactivate the auto-index and batch load the longest and largest rifle cartridges.
Complementing your press kit are the case conditioning tools to prepare your brass for loading. Includes Cutter, Lock Stud, Chamfer Tool, small and large Primer Pocket Cleaner, and a tube of Lee case sizing lube.
Complete your setup with a cartridge specific Case Length Gauge (sold separately). Verify your loads with the included Lee Safety powder scale. Completing the kit is Modern Reloading Second Edition, recently revised with all new load data covering 167 cartridges with over 28,000 loads.
NOTE: The bench plate mounting system shown in the picture is sold separately in the “Press Accessories” category.
INSIGHT OF THE MONTH:
Load Master Priming Problems
To get a Load Master working properly, there are a few things to consider that are inherent to the design of the press.
1. Each die in each set needs to be set properly so that the work is completed at the very top of the stroke. This is more necessary with a Load Master than a Dillon because the Load Master primes on the upstroke and it is an adjustable setting. Consider that if you set a die too deeply to prevent the carrier from reaching the top, and then set the primer seating depth to properly seat primers with this die set, everything works fine. Then, you switch calibers and the next die set allows the carrier to go further up – then your previously set primer system is now setting too deeply. All of the symptoms will show up – tilted primers, smashed primers, broken primer system parts, etc. In conclusion, all die sets should allow the carrier to go the top and have the work done at that location. If this is done, the primer system has to be set once and that’s it.
2. If the primer adjustment is set too deeply, what happens is that the primer slider has to try and place a primer up and on an already rising post. This results in damaged parts and mounds of frustration with the above symptoms. This is how to set it properly, but after doing so, operation has to be done in conjunction with #1. With no turret in the press, put a fired case (with spent primer in it) into station one and advance it to station #2. Be sure the primer seating depth bolt (on the left side of the press) is turned as high as it will go. When the carrier is at the top with the fired case in station #2, hold the handle down to keep the carrier at the top. With your left hand, push the primer rocker arm (the lever that the depth bolt pushes) down as far as it will go. This puts the priming plunger up tight against the bottom of the case. Turn the primer depth bolt down to meet this location (until it stops), lower the carrier and turn the bolt down further not quite a half turn more and secure it. Along with #1, you have just solved the priming problems that many complain about.
3. Primer problems on the Load Master is usually caused by the primer pin sticking up a small amount. To fix this problem you must determine what is causing the pin to not completely retract.
To solve these issues, start by removing the primer trough, looking into the carrier you will find a hexagon hole, on one of the corners of the hex there is a shelf to prevent the primer pin from dropping down too far. This shelf can become fouled with dirt, gunpowder, or case cleaning media. Clean this shelf of any foreign material.
Now carefully inspect the primer pin for any nicks or burrs. A small nick on the large diameter of the pin will cause it to stick up and cause primer tipping. Lubricate the large diameter of the primer pin with a very light film of oil and return it to the primer feed well. Be sure the small spring is installed and intact.
Remove the trough cover and carefully inspect the hole where the primer passes through. Remove any burrs on this hole with a sharp razor knife. Feel free to enlarge the hole to remove any burr. The hole does not provide guidance for the primer, but any burr will cause a potential tipped primer. Carefully inspect the primer slider for any nicks, burrs or flash and be certain you have the correct slider for the primer size (small or large).
Reinstall the trough cover and apply a very small drop of oil to the black primer lever pivot. Now reinstall the primer trough. Cycle the primer rocker and be sure the primer pin retracts completely.
Now is a good time to check the primer seating depth bolt for proper adjustment. Remove the turret and run the press to the top of the stroke. Push down on the primer rocker arm. If you are unable to push the rocker arm down a small amount you likely have the primer depth bolt set down too far. Many times, this is the result of incorrectly set dies at some point. If a sizing die is set further than to just touch the shell holder, the carrier cannot go all the way to the top. This can make the user believe that the primer seating depth is now incorrect and not deep enough. When the deeper adjustment is made to the primer depth, the priming pin rises prematurely. This causes the primer slider to have to push the primer up and on the pin instead of simply sliding it on. This setting results in tipped primers and destroyed primer sliders. More damage can occur when the carrier can once again go to the top because the offending die has been readjusted or a different and properly adjusted die set installed. The deeper primer adjustment is now putting far too much pressure on the primer rocker arm and a destroyed carrier will result.
One last helpful change is to place your sizing die in position 2 with its decapper removed. Put a decapping die in position one. This will align case perfectly to accept the primer.